
I have a Dell T710 at home with 130GiB of SAS and 5TiB of SATA. I don’t know why bought this really.
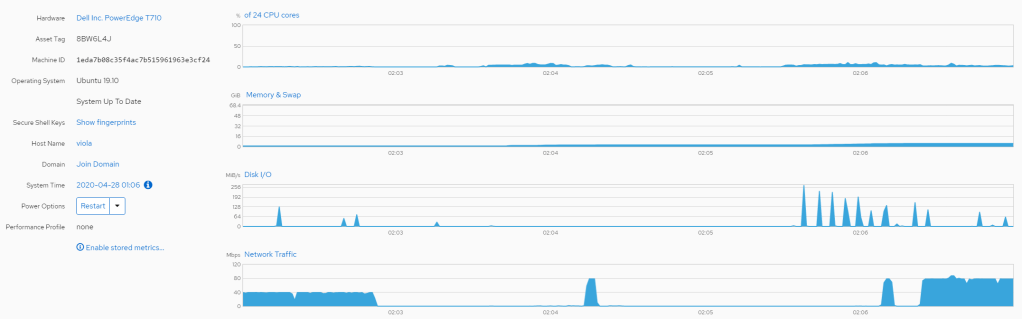
When it starts it sounds like a small jet getting started and the ambient noise level it adds is pretty wearing on the hearing. But it’s got 24 nippy cores across two sockets, 8 gig-ports and 64GiB of ram which makes it an ideal home server. After trying to get a development setup the way I like on a Pi 4 I decided that while that was fun and ‘cool’ I actually need a setup I can work from. So I’ve decided to finally install a K8s cluster on this beast. This is my journey.
I’m going to assume you’ve installed the latest Ubuntu 19.10 and updated and whatnot already. You’ll need to be comfortable on the command line too. You’ll note there’s not a lot fo sudo going on – I operate as root but feel free not to.
What I want is the ability to create a number of virtual machines on this box which will act as my closter nodes. The machines big enough for me to run a K8s single-node cluster directly but I’d like to brush some of my K8s skills up as well. Plus, this way I won’t pollute the system.
Let’s ket KVM and Qemu up and running then.
$ apt install qemu-system-x86 qemu-kvm qemu libvirt-daemon-system virt-manager virtinst bridge-utils cpu-checker virt-viewerLet’s run some checks:
$ sudo kvm-ok

INFO: /dev/kvm exists
KVM acceleration can be used
All looks good. Let’s run some more checks:
root@viola:/home/khushil# virt-host-validate
QEMU: Checking for hardware virtualization : PASS
QEMU: Checking if device /dev/kvm exists : PASS
QEMU: Checking if device /dev/kvm is accessible : PASS
QEMU: Checking if device /dev/vhost-net exists : PASS
QEMU: Checking if device /dev/net/tun exists : PASS
QEMU: Checking for cgroup 'cpu' controller support : PASS
QEMU: Checking for cgroup 'cpuacct' controller support : PASS
QEMU: Checking for cgroup 'cpuset' controller support : PASS
QEMU: Checking for cgroup 'memory' controller support : PASS
QEMU: Checking for cgroup 'devices' controller support : PASS
QEMU: Checking for cgroup 'blkio' controller support : PASS
QEMU: Checking for device assignment IOMMU support : PASS
QEMU: Checking if IOMMU is enabled by kernel : WARN (IOMMU appears to be disabled in kernel. Add intel_iommu=on to kernel cmdline arguments)
LXC: Checking for Linux >= 2.6.26 : PASS
LXC: Checking for namespace ipc : PASS
LXC: Checking for namespace mnt : PASS
LXC: Checking for namespace pid : PASS
LXC: Checking for namespace uts : PASS
LXC: Checking for namespace net : PASS
LXC: Checking for namespace user : PASS
LXC: Checking for cgroup 'cpu' controller support : PASS
LXC: Checking for cgroup 'cpuacct' controller support : PASS
LXC: Checking for cgroup 'cpuset' controller support : PASS
LXC: Checking for cgroup 'memory' controller support : PASS
LXC: Checking for cgroup 'devices' controller support : PASS
LXC: Checking for cgroup 'freezer' controller support : PASS
LXC: Checking for cgroup 'blkio' controller support : PASS
LXC: Checking if device /sys/fs/fuse/connections exists : PASS
That all looks good. I’m going to ignore the IOMMU warning for now. I don’t need the performance really but I should fix that soon.
You should now be able to see the default interface that KVM creates for you:
$ ip addr show virbr0
Let’s also have a look at the default network that KVM creates for you:
$ virsh net-list Name State Autostart Persistent ---------------------------------------------------------- default active yes yesNow let's get rid of that:$ virsh net-destroy default Network default destroyed $ virsh net-undefine default Network default has been undefinedNow let's get rid of the virbr0 interface:$ ip link set virbr0 down $ brctl delbr virbr0
We did that because we don’t just want a NAT network but one where the VMs can access and be easily accessed by the rest of my network. So we’re going to create a bridged network. First let’s backup our netplan config:
$ cp /etc/netplan/50-cloud-init.yml /etc/netplan/50-cloud-init.yml.backup
Now I edited the file to make it look like this:

Your IPs and so on will vary probably. I want the VMs to use the second network port so I’ve disabled eno2 and setup a br0 which basically grabs that interface. The .5 is my internal DNS by the way.
Now I generate and apply that netplan:
$ netplan generate
$ netplan --debug apply
Now let’s see if it’s worked:

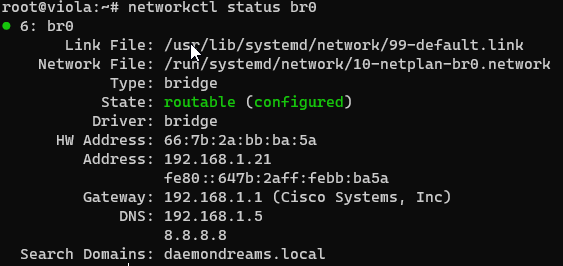
Note this is routable and configured. This means we should be able get to our default gateway and out ot the Internets as well as allowing any other client on the same network or other which can route via that gateway to get to our VMs.
Let’s now create the bridge network that we want. I’m going to create a file called default.xml somwhere safe and version controlled with the following content:
<network>
  <name>default</name>
  <forward mode="bridge"/>
  <bridge name="br0"/>
</network>
Once saved I’m going to get that network built and enabled:
$ virsh net-define default.xml
$ virsh net-start default
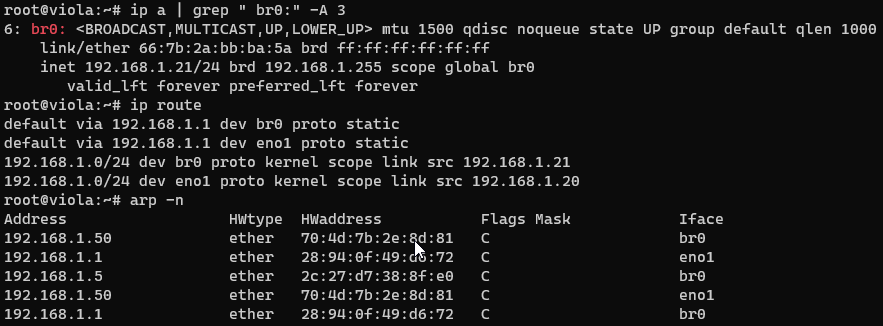
$ virsh net-autostart defaultNow that’s done let’s check it’s up and running:

And that’s it. We not have everything setup as we need it for VMs. On to K8s setup next!


3 responses to “Setting up my T710 for VMs and bridged networking”
Don’t quite get the featured image of the article… What’s that got to do with VM and programing, but anyway … see lot of things about networking too… But here’s one for you … since it does has something interesting in it … as idea … I’m thinking about going really deep in this so… what would you advice me? between setting up a server … or start playing with a raspberry and turn it in a good server on a internet connection on optic fiber that has up to 90 MB on upload speed … but might be come bigger in the future?…
LikeLike
Thanks for your comment Daniel. What area are you trying to get into? If it’s networking, I’d recommend getting a small lab setup from eBay and working through some CCNA examples. Setup your own ASA, setup your own DNS, DHCP or even Active Directory forest at home. Actually setting up a server to use as a webserver online is pretty easy but if you run it from you home machine make sure your security is tight. Any time you expose anything to the Internet you’re going to get hit with a million and one script kiddies trying to break in. The message really is to identify where you want to learn more about and focus on that. Twenty years ago I began with programming in ASM and C. Today, at home, I’m getting back down the the low level things as I spend my work-life build cloud transformations for big organisations – which is financially rewarding but quite a dull activity for an old-school engineer like me 🙂
LikeLiked by 1 person
Interesting.. I’ll think about this and come back with a detailed reply late. Thank you… by the way … ebay is a good idea but amazon has better prices… in my oppinion .. as for security … I’m quite careful to that I’m already thinking about fisical firewalls and the rest of the fun part…
LikeLike